Blog

  • EV Powertrain 101: Motor, Inverter, and Battery Basics

    EV Powertrain 101: Motor, Inverter, and Battery Basics

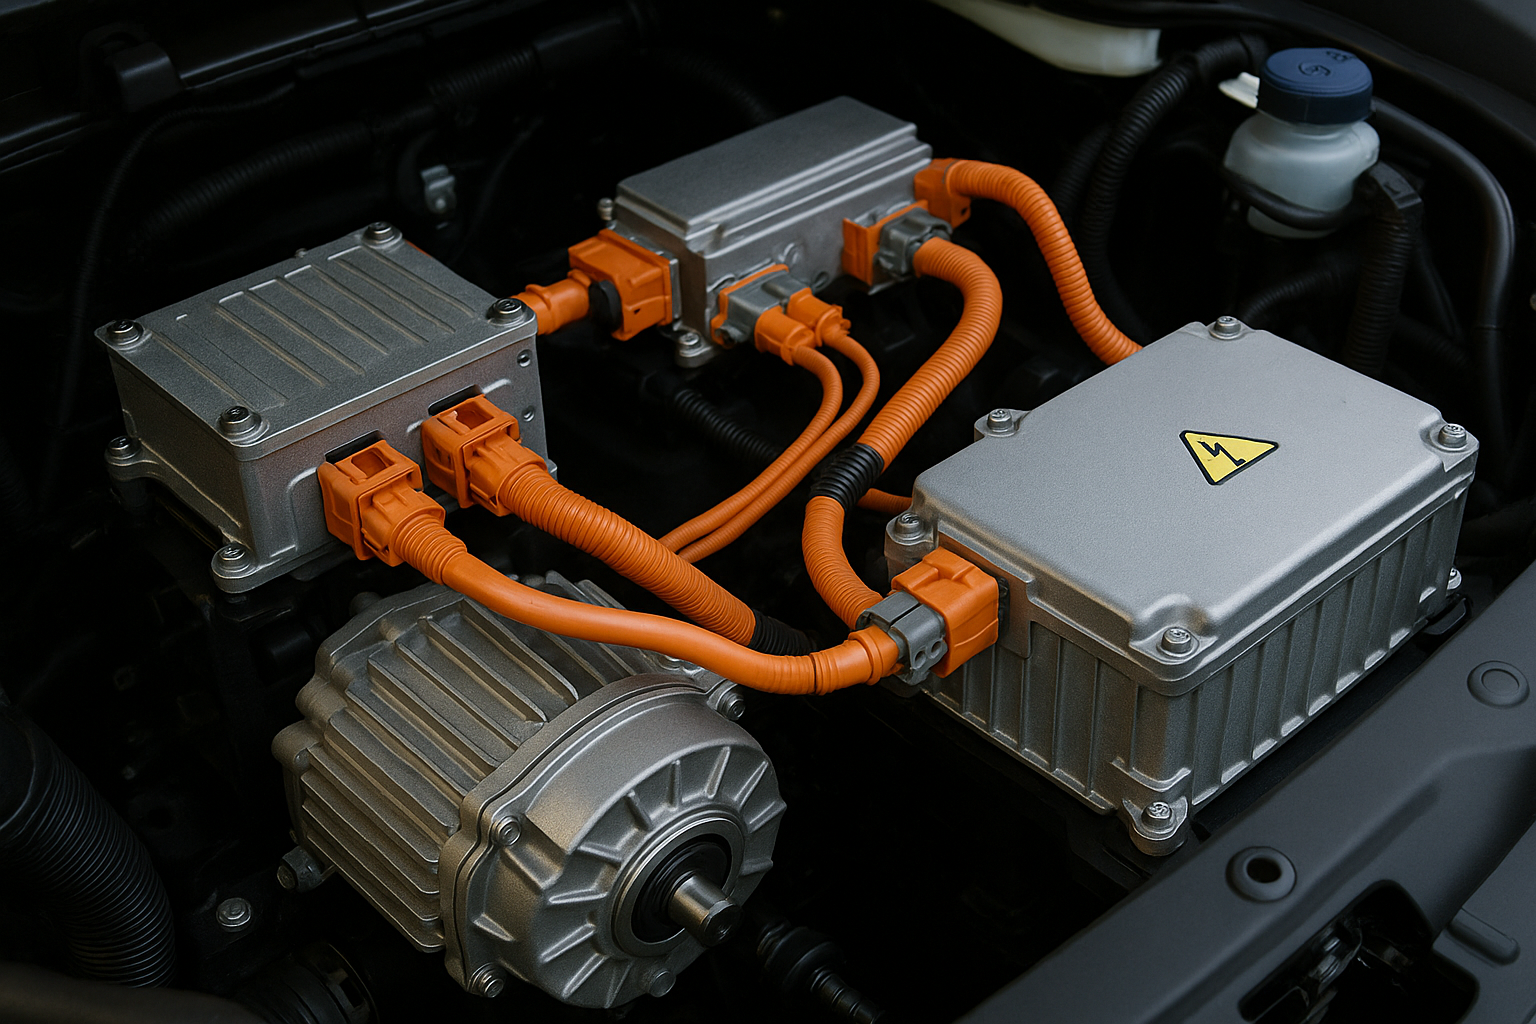
    Electric vehicles rely on a fundamentally different drivetrain than traditional gasoline cars. The heart of an EV is its EV powertrain, which consists primarily of the electric motor, inverter, and battery pack. Understanding the roles and interactions of these components—electric motor basics and battery fundamentals—is key to appreciating how EVs achieve instant torque, high efficiency, and zero tailpipe emissions.

    1. The EV Powertrain Overview

    An EV powertrain replaces the internal combustion engine, transmission, and fuel system with three main elements:

    • Electric Motor: Converts electrical energy into mechanical rotation to drive the wheels.
    • Inverter: Manages power flow by converting DC battery voltage into AC for the motor, and vice versa during regenerative braking.
    • Battery Pack: Stores electrical energy in a series of cells and delivers it on demand to the inverter and motor.

    Unlike multi‑gear transmissions in ICE vehicles, many EVs use a single reduction gear, relying on the motor’s wide torque band for acceleration and cruising.

    2. Electric Motor Basics

    The electric motor is the centerpiece of EV propulsion. There are several common types:

    • Permanent Magnet Synchronous Motor (PMSM): Uses rare-earth magnets on the rotor to create a constant magnetic field, offering high efficiency and power density.
    • Induction Motor: Relies on electromagnetic induction to generate rotor currents; robust and inexpensive but slightly less efficient at low loads.
    • Switched Reluctance Motor (SRM): Utilizes variable reluctance in the magnetic circuit; emerging for its simplicity and high-temperature tolerance.

    In operation, the inverter supplies three-phase AC currents to the stator windings. These currents create a rotating magnetic field, which interacts with the rotor’s field (permanent magnets or induced currents) to produce torque. The motor’s instantaneous torque—available from zero RPM—delivers the brisk acceleration EVs are known for.

    3. Inverter Function and Control

    The inverter serves as the brain of the EV powertrain. Key roles include:

    • DC-to-AC Conversion: Transforms the battery’s DC voltage into variable-frequency AC to control motor speed and torque.
    • Regenerative Braking: Captures kinetic energy during deceleration by reversing the motor’s operation, converting mechanical energy back into electrical energy and storing it in the battery.
    • Thermal Management: Monitors and manages its own temperature to avoid overheating under high loads.

    Modern inverters use high‑speed semiconductor switches (IGBTs or SiC MOSFETs) and sophisticated pulse‑width modulation (PWM) algorithms to deliver smooth torque control, high efficiency, and precise response.

    4. Battery Fundamentals

    The battery pack is the EV’s fuel tank. Understanding battery fundamentals involves:

    • Cell Chemistry: Most EVs use lithium‑ion cells—variations include NMC (nickel manganese cobalt), LFP (lithium iron phosphate), and NCA (nickel cobalt aluminum)—each balancing energy density, cost, and longevity.
    • Module & Pack Design: Cells are grouped into modules, which are assembled into a pack. The pack includes structural support, cooling plates, and wiring harnesses.
    • Battery Management System (BMS): Monitors cell voltages, temperatures, and currents, ensuring balanced charging/discharging and protecting against over‑charge or over‑discharge.
    • Thermal Control: Liquid or air cooling maintains optimal cell temperature (often 20–40 °C) to preserve performance and lifespan.

    Pack capacity, measured in kilowatt‑hours (kWh), directly influences driving range. Efficient thermal and BMS strategies help maximize usable capacity and extend battery life.

    5. Integration & Efficiency Considerations

    To maximize overall efficiency, EV designers integrate motor, inverter, and battery into a cohesive system:

    • Power Electronics Co‑Location: Placing the inverter close to the motor reduces high‑voltage wiring losses.
    • Regenerative Braking Tuning: Balances energy recapture with drivability, modulating how aggressively the motor switches to generator mode.
    • Thermal Synergy: Shared cooling loops for motor, inverter, and battery minimize system complexity and improve thermal stability.

    Careful system integration allows leading EVs to achieve well over 90 percent drivetrain efficiency—far surpassing most internal combustion vehicles.

    Conclusion

    Mastering the electric motor basics, inverter control, and battery fundamentals provides a solid foundation for understanding any EV. The EV powertrain blends these technologies to deliver quiet, efficient, and high‑torque propulsion. As innovations in motor design, power electronics, and battery chemistry continue, future EVs will only become more capable, affordable, and sustainable.

  • Understanding OBD‑II Codes and What They Mean

    Understanding OBD‑II Codes and What They Mean

    If your dashboard’s “Check Engine” light ever comes on, grabbing an OBD‑II scanner is the first step to diagnosing the problem. This OBD‑II guide will help you decode check engine codes—officially known as diagnostic trouble codes (DTCs)—so you can understand what your vehicle’s computer is telling you and decide your next move.

    1. What Is OBD‑II?

    OBD‑II (On‑Board Diagnostics, Second Generation) is a standardized system in vehicles manufactured since 1996 that monitors engine and emissions systems. When the powertrain control module (PCM) detects a fault—be it a loose gas cap or a misfiring cylinder—it stores a corresponding DTC and illuminates the “Check Engine” light.

    System Monitored by OBD‑II

    • Engine misfires and ignition faults
    • Fuel system and mixture control
    • Exhaust gas recirculation (EGR) and catalytic converter efficiency
    • Evaporative emissions (EVAP) leaks
    • Sensors such as oxygen (O₂), mass air flow (MAF), and manifold absolute pressure (MAP)

    2. Anatomy of a Diagnostic Trouble Code

    Each DTC follows a five‑character format: [Letter][Digit][Digit][Digit][Digit].

    • Letter: Indicates system
      • P: Powertrain (engine and transmission)
      • B: Body (airbags, climate control)
      • C: Chassis (ABS, suspension)
      • U: Network & vehicle integration
    • First Digit:
      • 0 = Standard (SAE defined)
      • 1 = Manufacturer‑specific
    • Second Digit: Subsystem
      • P0xxx = Fuel & air metering
      • P2xxx = Injector circuit
      • P3xxx = Ignition system
      • P4xxx = Auxiliary emissions controls
      • P5xxx = Vehicle speed controls & idle control
      • P6xxx = Computer output circuits
      • P7xxx–P8xxx = Transmission
    • Last Two Digits: Specific fault identifier (00–99)

    3. Common Check Engine Codes

    Here are a few frequently encountered OBD‑II codes and what they typically indicate:

    • P0171 / P0174: System Too Lean – Bank 1/2 (often due to vacuum leaks or faulty MAF sensor)
    • P0300: Random/Multiple Cylinder Misfire Detected (ignition, injector, or compression issue)
    • P0420: Catalyst System Efficiency Below Threshold (catalytic converter or O₂ sensor problem)
    • P0442: Evaporative Emission Control System Leak Detected (small EVAP leak, possibly a loose gas cap)
    • P0128: Coolant Thermostat Below Regulating Temperature (stuck open thermostat)

    4. How to Read and Interpret Codes

    Follow these steps in your DIY OBD‑II guide workflow:

    1. Connect a Scanner: Plug your OBD‑II reader into the port—usually under the dashboard.
    2. Power On: Turn the ignition to the “ON” position without starting the engine.
    3. Retrieve Codes: Follow prompts on the scanner to “Read Codes.” Write down all stored codes.
    4. Look Up Definitions: Use your scanner’s database or an online DTC list to find code meanings.
    5. Check Freeze Frame Data: Some scanners display the engine conditions when the fault occurred (temperature, load, speed).
    6. Clear Codes & Test Drive: After repairs, clear codes and drive to ensure the light stays off and no new codes appear.

    5. Next Steps After Reading Codes

    Once you have your diagnostic trouble codes, proceed as follows:

    • Verify the Fault: Confirm the issue by visual inspection—check wiring, hoses, and connectors related to the code.
    • Perform Repairs or Replacements: Replace faulty sensors, tighten gas caps, or address leaks as indicated by the code.
    • Reset and Monitor: Clear codes and run another scan after a brief drive to verify the solution.
    • Seek Professional Help: If codes persist or repair is complex (e.g., internal transmission faults), consult a qualified mechanic.

    Conclusion

    Grasping the basics of the OBD‑II guide and knowing how to check engine codes empowers you to diagnose many common issues yourself. By interpreting diagnostic trouble codes accurately and following a logical repair process, you’ll save time and money—plus gain confidence in maintaining your vehicle’s health.

  • Preparing Your Car for Winter: Essential Maintenance Checklist

    Preparing Your Car for Winter: Essential Maintenance Checklist

    Winter weather can be harsh on your vehicle, making winter car prep and thorough cold weather maintenance vital for safety and reliability. From checking your antifreeze check levels to inspecting your battery and tires, this checklist will help you get your car ready for the season ahead.

    1. Inspect and Top Off Fluids

    Antifreeze/Coolant Check

    Proper coolant levels and mixture protect your engine from freezing and overheating. Follow these steps:

    1. Ensure the engine is cool before opening the radiator or reservoir cap.
    2. Check coolant level against “Min” and “Max” marks.
    3. Verify a 50/50 mix of antifreeze and distilled water (or per manufacturer recommendation).
    4. Top off with premixed coolant if levels are low, then securely replace the cap.

    Engine Oil

    Cold weather causes oil to thicken. Switching to a lower-viscosity winter-grade oil can improve startup performance:

    • Consult your owner’s manual for recommended winter oil viscosity (e.g., 5W-30 instead of 10W-30).
    • Perform an oil change before temperatures drop consistently below freezing.

    Other Fluids

    • Brake Fluid: Check level and top off if needed; moisture in old fluid can freeze.
    • Windshield Washer Fluid: Use a low-temperature or “rain‑X” formula to prevent freezing.
    • Power Steering Fluid: Verify level and condition, adding fluid if below “Min.”

    2. Check Battery and Electrical System

    Cold temperatures reduce battery capacity. A weak battery may fail when you need it most:

    • Use a multimeter to test voltage (should read ~12.6V at rest).
    • Inspect terminals for corrosion and clean with a battery‑terminal brush.
    • Consider replacing if battery is over three years old or reads below 12.4V.
    • Test headlights, brake lights, turn signals, and heater/defroster operation.

    3. Inspect Tires and Brakes

    Winter Tires vs. All‑Season

    For areas with heavy snow and ice, dedicated winter tires improve traction:

    • Check tread depth (minimum 6/32” recommended for winter use).
    • Maintain correct tire pressure—cold air can drop pressure by 1 psi for every 10°F decrease.
    • Rotate tires and inspect for uneven wear.

    Brake System

    Ensure your braking system is in top shape:

    • Check brake-pad thickness and replace if below 3 mm.
    • Inspect rotors for warping or scoring.
    • Test ABS and traction‑control systems for proper function.

    4. Evaluate Heating, Defroster & Wipers

    Visibility and cabin warmth are crucial in winter:

    • Test the heater and defroster; clear vents of debris.
    • Replace windshield wipers with winter blades to resist ice buildup.
    • Inspect wiper arms for spring tension and proper pressure.
    • Clean windshield thoroughly, then apply a rain‑repellent treatment.

    5. Emergency Kit & Accessories

    Prepare for unexpected breakdowns or road emergencies:

    • Keep a kit with jumper cables, flashlight, blankets, and gloves.
    • Include ice scraper and small snow brush.
    • Pack non‑perishable snacks, bottled water, and a first‑aid kit.
    • Carry traction aids such as sand, kitty litter, or traction mats.

    6. Final Checks and Seasonal Storage

    Before the first freeze, complete these final steps:

    • Inspect belts and hoses for cracks or wear; cold exacerbates damage.
    • Lubricate door and trunk seals with silicone spray to prevent freezing shut.
    • Verify spare tire condition, jack, and lug wrench accessibility.
    • If storing a secondary vehicle, top off all fluids, disconnect the battery, and cover the car.

    Conclusion

    Conducting a thorough winter car prep and following a comprehensive cold weather maintenance routine—particularly an accurate antifreeze check—ensures your vehicle remains reliable, safe, and efficient throughout the colder months. Add this checklist to your seasonal maintenance plan, and you’ll be ready to conquer snow, ice, and low temperatures with confidence.

  • Guide to Rotating Tires for Even Wear

    Guide to Rotating Tires for Even Wear

    Proper tire rotation is one of the simplest yet most effective ways to maximize tire longevity and maintain vehicle safety. By following a consistent tire rotation guide, you can ensure your tires wear evenly, improve handling, and get the most miles out of each set. In this article, we’ll explain why rotation matters, when to rotate, and provide a step‑by‑step rotate tires DIY procedure.

    1. Why Rotate Your Tires?

    Tires wear differently depending on their position on the vehicle. Front wheels handle steering, braking, and most of the vehicle’s weight, causing more rapid wear on front tires. Rear tires may wear more evenly but still benefit from swapping positions. Regular rotation balances wear patterns, delivering benefits such as:

    • Improved Handling: Evenly worn tires maintain consistent traction and steering response.
    • Extended Tire Life: Balanced wear delays the need for replacement, maximizing your investment.
    • Enhanced Fuel Efficiency: Properly rotating and maintaining tires reduces rolling resistance.
    • Safer Performance: Even tread depth helps maintain braking distances and wet weather grip.

    2. When to Rotate Your Tires

    Most manufacturers recommend rotating tires every 5,000–8,000 miles, often coinciding with oil changes. However, you should inspect tread depths and wear patterns every 3,000 miles and rotate sooner if you notice uneven wear. Key indicators include:

    • Feathered or scalloped edges on front tires
    • Center wear on overinflated rear tires
    • Excessively worn outer shoulders

    Consult your owner’s manual for specific intervals, but aim for at least two rotations per year for regular drivers.

    3. Common Rotation Patterns

    Your vehicle’s drivetrain—front‑wheel drive (FWD), rear‑wheel drive (RWD), all‑wheel drive (AWD)—determines the best rotation pattern. Below are the most common configurations:

    3.1 Forward Cross (FWD Vehicles)

    • Front-left → Rear-right
    • Front-right → Rear-left
    • Rear-left → Front-left
    • Rear-right → Front-right

    3.2 X‑Pattern (RWD & AWD Vehicles)

    • Front-left → Rear-right
    • Front-right → Rear-left
    • Rear-left → Front-right
    • Rear-right → Front-left

    3.3 Rearward Cross (RWD Vehicles)

    • Rear-left → Front-left
    • Rear-right → Front-right
    • Front-left → Rear-right
    • Front-right → Rear-left

    4. DIY Tire Rotation Step‑by‑Step

    Follow this rotate tires DIY procedure to perform your own rotation safely and efficiently.

    Tools & Materials

    • Floor jack and jack stands
    • Lug wrench or impact gun
    • Tire pressure gauge
    • Marker or chalk to label tire positions
    • Torque wrench (for lug nuts)

    Procedure

    1. Park & Prepare: Choose level ground, engage the parking brake, and block wheels to prevent rolling.
    2. Loosen Lug Nuts: Break lug nuts loose on all four wheels before lifting the vehicle. Do not remove them completely yet.
    3. Lift Vehicle: Use a floor jack to raise one corner, then secure with jack stands. Repeat for each corner as you rotate.
    4. Remove Tires: Fully remove lug nuts and take off tires, keeping track of each position (e.g., “FL” for front‑left).
    5. Apply Rotation Pattern: Swap tires according to your vehicle’s drivetrain and chosen rotation pattern.
    6. Reinstall & Hand‑Tighten: Put tires back on hubs, hand‑tighten lug nuts in a star or crisscross sequence.
    7. Lower & Torque: Carefully lower the vehicle and use a torque wrench to tighten lug nuts to manufacturer specifications.
    8. Check Pressure & Inspect: Verify tire pressures match recommended values and inspect for any damage or debris.

    5. Tips for Maximizing Tire Longevity

    • Maintain Proper Inflation: Check tire pressure monthly to avoid uneven wear.
    • Balance & Align: Have tires balanced and wheels aligned annually or when you notice vibration.
    • Monitor Tread Depth: Use a gauge to ensure tread remains above 2/32″ for safe operation.
    • Rotate Regularly: Consistent rotations according to your tire rotation guide will spread wear evenly.

    Conclusion

    Performing your own tire rotations with this comprehensive tire rotation guide not only saves money but also enhances safety and performance. By rotating every 5,000–8,000 miles, following the correct pattern for your drivetrain, and combining rotation with proper inflation, balancing, and alignment, you’ll extend tire life and ensure a smoother, safer ride. Make tire care a routine part of your maintenance schedule, and your tires will thank you with thousands of additional miles of dependable service.

  • How to Check and Top Off Your Car Fluids

    How to Check and Top Off Your Car Fluids

    Regular car fluid check and proper top off fluids routines are essential to maintaining peak performance and preventing costly repairs. From engine oil to coolant brake fluid, each fluid plays a critical role in lubrication, cooling, and safe operation. In this guide, we’ll cover the most important fluids in your vehicle, show you how to inspect levels, and explain the correct topping‑off procedures.

    1. Tools & Materials You’ll Need

    • Clean shop rags or paper towels
    • Funnel
    • Owner’s manual (for fluid specifications)
    • Correct type of fluids: engine oil, coolant, brake fluid, power steering fluid, windshield washer fluid
    • Protective gloves and safety glasses

    2. Engine Oil

    Why It Matters

    Engine oil lubricates internal components, reduces friction, and carries away heat and contaminants. Low oil levels can cause increased wear and potential engine damage.

    How to Check

    1. Park on level ground and turn off the engine. Wait 5–10 minutes to allow oil to settle.
    2. Locate the dipstick (usually with a yellow handle) and remove it.
    3. Wipe it clean, reinsert fully, then pull it out again.
    4. Read the oil level: it should be between the “Min” and “Max” marks.

    How to Top Off

    1. Remove the oil‑fill cap (often labeled “Oil” or showing an oil can icon).
    2. Using a funnel, add oil in small increments (¼ quart at a time).
    3. Recheck the dipstick after each addition until the level reaches the “Max” mark.
    4. Replace the fill cap securely.

    3. Coolant

    Why It Matters

    Coolant (antifreeze) regulates engine temperature, prevents overheating, and protects against freezing in cold weather.

    How to Check

    1. Ensure the engine is cold to avoid scalding.
    2. Locate the coolant reservoir (a translucent tank near the radiator).
    3. Read the level against the “Low” and “Full” marks on the tank.

    How to Top Off

    1. Mix coolant and distilled water at the manufacturer’s recommended ratio (often 50/50).
    2. Remove the reservoir cap slowly to release any pressure.
    3. Pour the mixture until the level reaches the “Full” line.
    4. Replace the cap securely and inspect hoses for leaks.

    4. Brake Fluid

    Why It Matters

    Brake fluid transmits hydraulic pressure to the brake calipers. Low levels can compromise stopping power and safety.

    How to Check

    1. Locate the brake‑fluid reservoir (usually near the firewall on the driver’s side).
    2. Check the fluid level against the “Min” and “Max” indicators.

    How to Top Off

    1. Clean around the reservoir cap to prevent contamination.
    2. Remove the cap and add only the specified DOT fluid (DOT 3, 4, etc.).
    3. Fill to the “Max” mark—do not overfill.
    4. Replace and tighten the cap, then pump the brake pedal to clear air.

    5. Power Steering & Windshield Washer Fluids

    Power Steering Fluid

    1. Locate the power‑steering reservoir under the hood.
    2. Check fluid level against markings on the dipstick attached to the cap.
    3. Top off with the correct type (as per manual), avoiding overfilling.

    Windshield Washer Fluid

    1. Find the washer‑fluid reservoir—often marked with a windshield/water icon.
    2. Pour in washer fluid until it nears the top.
    3. Use diluted windshield‑washing concentrate as needed, depending on climate.

    6. Final Checks & Tips

    • Inspect for Leaks: Look under the car and around reservoirs after driving.
    • Follow Service Intervals: Replace fluids according to manufacturer guidelines.
    • Use Quality Products: Genuine or high‑grade fluids protect system components.
    • Record Your Work: Note dates and mileage in your maintenance log.

    Conclusion

    A regular car fluid check and timely top off fluids keep your vehicle running smoothly, efficiently, and safely. By monitoring engine oil, coolant brake fluid, power steering fluid, and washer fluid, you’ll extend component life, maintain performance, and prevent unexpected breakdowns. Make fluid inspections a routine part of your maintenance schedule and enjoy peace of mind on every drive.

  • Replacing Your Air Filter: Improve Performance and Efficiency

    Replacing Your Air Filter: Improve Performance and Efficiency

    Regular air filter replacement is one of the simplest yet most impactful maintenance tasks you can perform on your vehicle. A clean engine air filter ensures optimal car airflow, helping your engine breathe easily, burn fuel efficiently, and reduce harmful emissions. In this guide, we’ll explore why air filter maintenance matters, how to choose the right filter, and walk you through a step‑by‑step replacement process.

    1. Why a Clean Air Filter Matters

    As your car runs, the air intake system sucks in dust, pollen, and debris. Over time, these contaminants clog the filter media, restricting airflow to the engine. Benefits of a clean air filter include:

    • Improved Fuel Economy: With unobstructed air, the engine burns fuel more completely, reducing trips to the pump.
    • Enhanced Engine Performance: Better combustion translates to smoother acceleration and more consistent power delivery.
    • Lower Emissions: Cleaner airflow helps the catalytic converter work efficiently, reducing pollutants released into the environment.

    2. Types of Engine Air Filters

    There are several designs of engine air filters, each with pros and cons:

    • Paper Filters: Affordable and disposable, paper elements trap fine particles but need frequent changes.
    • Cotton Gauze (Oiled) Filters: Reusable and high‑flow, these require periodic cleaning and re‑oiling to maintain performance.
    • Foam Filters: Common in off‑road vehicles, foam offers excellent debris capture but may restrict airflow if not properly maintained.

    Choose a filter that balances filtration efficiency with adequate car airflow, based on your driving conditions.

    3. When to Replace Your Air Filter

    Most manufacturers recommend inspecting or replacing the air filter every 12,000–15,000 miles, but you may need to change it sooner if you:

    • Drive frequently on dirt roads or in dusty environments.
    • Notice reduced acceleration or engine hesitation.
    • See a dark, clogged filter during a visual check.

    Consult your owner’s manual for specific intervals and inspection procedures.

    4. Step‑by‑Step Air Filter Replacement Guide

    Step 1: Locate the Air Filter Housing

    Open your hood and find the airbox—typically a black plastic container connected to the intake tubing. It may be secured with clips, screws, or clamps.

    Step 2: Remove the Old Filter

    1. Undo the fasteners holding the airbox lid in place.
    2. Lift off the lid and carefully remove the old engine air filter.
    3. Note the orientation of the filter to ensure correct installation of the new one.

    Step 3: Clean the Housing

    Use a clean, dry cloth or a vacuum to remove leaves, dirt, and debris from inside the airbox. A clean housing prevents premature clogging of your new filter.

    Step 4: Install the New Filter

    1. Place the new filter in the housing, matching the exact orientation of the old one.
    2. Ensure the filter sits flush, with no gaps around the edges.

    Step 5: Secure the Housing and Test

    1. Reinstall the airbox lid and fasten all clips or screws snugly.
    2. Start the engine and listen for smooth idling—no hissing or whistling indicates a proper seal.

    5. Benefits of Regular Air Filter Replacement

    Consistently replacing your air filter delivers ongoing advantages:

    • Extended Engine Life: Clean air reduces wear on pistons and cylinders.
    • Consistent Performance: Maintains factory‑rated horsepower and torque.
    • Cost Savings: Prevents expensive repairs caused by restricted airflow and contaminated sensors.

    6. Tips for Maximizing Car Airflow and Performance

    • Check Seals and Ducts: Ensure intake hoses and clamps are tight, preventing unfiltered air leaks.
    • Upgrade Wisely: Performance filters can boost airflow, but balance gains with filtration efficiency.
    • Monitor Engine Light: A clogged filter can trigger the check‑engine light—address it promptly.
    • Avoid Over‑Oiling: If using an oiled filter, apply oil sparingly to prevent sensor contamination.

    Conclusion

    Following this simple air filter replacement process ensures your engine air filter operates at peak efficiency, maintaining proper car airflow and protecting your engine. Schedule inspections at regular intervals, choose the right filter type for your driving needs, and enjoy improved fuel economy, smoother performance, and lower emissions. A clean air filter is a small investment with big returns for your vehicle’s health and longevity.

  • Checking and Replacing Spark Plugs in 7 Easy Steps

    Checking and Replacing Spark Plugs in 7 Easy Steps

    Regular spark plug service is a cornerstone of a proper engine tune‑up. Worn or fouled spark plugs can cause misfires, poor fuel economy, and hard starts. By following this straightforward spark plug replacement guide, you’ll save time and money—and enjoy smoother performance. In just seven steps, you can master DIY spark plugs installation and keep your engine firing on all cylinders.

    Tools & Materials You’ll Need

    • Spark plugs: Verify the correct heat range and gap per your owner’s manual.
    • Spark plug socket & ratchet: Typically 5/8” or 13/16”.
    • Spark plug gap gauge: For checking and adjusting plug gap.
    • Torque wrench: Ensures correct plug tightening (usually 18–25 ft‑lb).
    • Dielectric grease: Prevents corrosion and eases future removal.
    • Compressed air or shop vacuum: To clear debris around plug wells.
    • Safety gloves & eye protection.

    Step‑by‑Step Spark Plug Replacement

    Step 1: Prepare the Engine

    Park on level ground, cool the engine for at least 30 minutes, and disconnect the negative battery terminal. This prevents accidental cross‑firing and protects electronic components.

    Step 2: Clear Debris

    Using compressed air or a shop vacuum, blow out any dust or dirt around each spark plug well. This avoids debris falling into the cylinder once the plug is removed.

    Step 3: Remove Ignition Coils or Wires

    Depending on your vehicle’s ignition system:

    • Coil‑on‑plug systems: Unbolt and gently pull out the ignition coil.
    • Distributor or coil‑pack systems: Firmly pull the spark plug wire boot off the plug, twisting slightly to break the seal.

    Step 4: Extract the Old Spark Plug

    Attach the spark plug socket to your ratchet and carefully thread it onto the plug. Turn counterclockwise to loosen and remove the old plug. Inspect it for deposits or damage (e.g., oily fouling, blistered insulator) as part of your engine tune‑up diagnostics.

    Step 5: Check & Adjust the Gap

    Using a gap gauge, measure the electrode gap on each new spark plug. Adjust by gently bending the ground electrode until it matches the specification in your owner’s manual. Proper gap ensures consistent ignition and optimal combustion.

    Step 6: Install New Spark Plugs

    1. Apply a small dab of anti‑seize compound to the plug threads (optional but helps future removal).
    2. Carefully thread the new plug into the hole by hand to avoid cross‑threading.
    3. Use the torque wrench to tighten to the manufacturer’s specified torque (generally 18–25 ft‑lb).

    Step 7: Reinstall Coils or Wires & Test

    Before reattaching ignition coils or wires, apply a light coat of dielectric grease inside the boot to seal out moisture. Reconnect each coil or wire in its correct order. Reconnect the battery, start the engine, and listen for smooth idling. A steady, quiet idle indicates successful DIY spark plugs replacement.

    Tips for Successful Spark Plug Maintenance

    • Work one cylinder at a time: Prevents mixing up wires or coils.
    • Replace in cold weather: Cooler temperatures help you work safely and prevent heat‑soaked components.
    • Keep track of old plugs: Save them for inspection—patterns can reveal engine issues like lean/rich running or oil leaks.
    • Follow service intervals: Most spark plugs last 30,000–100,000 miles depending on type (copper, platinum, iridium).

    Conclusion

    Completing a spark plug replacement on your own is a rewarding part of any engine tune‑up. With proper tools, attention to detail, and a methodical approach, your DIY spark plugs service will deliver reliable starts, improved fuel efficiency, and reduced emissions. Keep a regular schedule, inspect plugs for wear patterns, and enjoy smooth, confident driving mile after mile.

  • Steering & Suspension Basics: Keeping Your Ride Smooth

    Steering & Suspension Basics: Keeping Your Ride Smooth

    A comfortable drive isn’t just about plush seats—it starts with a well‑tuned steering system and solid suspension basics. Together, these components absorb bumps, maintain tire contact, and ensure precise control. In this guide, we’ll explore how your car’s steering and suspension work, why they matter for ride comfort, and what you can do to keep both systems in top shape.

    1. How Your Steering System Works

    Your steering system directs the vehicle’s wheels so you can navigate corners, lanes, and curves with confidence. Modern cars typically use a rack‑and‑pinion design with power assistance:

    • Rack & Pinion: A gearset converts the rotational motion of the steering wheel into lateral motion that turns the wheels.
    • Power Steering: Uses hydraulic or electric assist to reduce the effort required, especially at low speeds.
    • Tie Rods & Steering Arms: Connect the rack to the wheel hubs, transmitting motion precisely.

    Common Steering Issues

    • Loose Steering Feel: Worn tie‑rod ends or rack bushings can introduce play, reducing control.
    • Squealing or Hissing: A failing power‑steering pump or low fluid can create noise and stiff steering.
    • Pulling to One Side: Misalignment or uneven tire pressure may cause your car to drift.

    2. Suspension Basics: Absorbing Road Irregularities

    The suspension system is your car’s shock absorber, smoothing out potholes, bumps, and road chatter. Key suspension basics components include:

    • Springs: Coil springs or leaf springs support vehicle weight and compress under load.
    • Shock Absorbers & Struts: Control spring oscillation, dampening rebound and preventing excessive bounce.
    • Control Arms & Ball Joints: Keep wheels aligned and provide flexible mounting points for suspension travel.
    • Sway Bars (Anti‑Roll Bars): Reduce body roll during cornering by linking opposite wheels.

    Types of Suspension

    • MacPherson Strut: Compact and cost‑effective—common on front‑wheel‑drive cars.
    • Double Wishbone: Offers better camber control—favored on performance vehicles.
    • Multi‑Link: Provides independent tuning of ride and handling—found on luxury models.

    3. Why Steering and Suspension Matter for Ride Comfort

    A well‑maintained steering system and properly tuned suspension directly improve ride comfort by:

    • Smoothness: Efficient absorption of bumps prevents jolts from reaching the cabin.
    • Stability: Consistent tire contact enhances traction and reduces body roll.
    • Control: Precise steering response makes for a confident, fatigue‑free drive.

    Signs Your Ride Needs Attention

    • Excessive bouncing after hitting a bump.
    • Front‑end vibration or wandering at highway speeds.
    • Uneven or rapid tire wear patterns.
    • Steering feels heavy, loose, or unresponsive.

    4. Maintenance Tips for a Smooth Ride

    Regular upkeep of your steering and suspension keeps you safe and comfortable on the road. Here’s what to do:

    • Inspect Components: Every 6,000 miles, check shocks, struts, bushings, and tie rods for leaks or play.
    • Rotate & Balance Tires: Proper rotation and balance reduce uneven wear and vibration.
    • Maintain Fluid Levels: Keep power‑steering fluid at the correct level and replace it according to the manufacturer’s schedule.
    • Wheel Alignment: Perform a 4‑wheel alignment annually or after suspension work to ensure correct steering geometry.
    • Replace Worn Parts Promptly: Swap out failing shocks, struts, or bushings before they cause further damage.

    Conclusion

    Mastering suspension basics and understanding your steering system are key steps toward achieving superior ride comfort. By recognizing warning signs, following a routine maintenance schedule, and choosing quality replacement parts, you’ll enjoy a smoother, safer, and more enjoyable driving experience for years to come.

  • Automatic vs. Manual Transmissions: Pros and Cons

    Automatic vs. Manual Transmissions: Pros and Cons

    When shopping for a new car, one of the first choices you’ll face is automatic vs manual transmission. Understanding the differences between transmission types and performing a thorough gearbox comparison can help you choose the right vehicle for your driving style. In this article, we’ll explore how each system works, weigh the pros and cons, and offer tips on selecting the best option.

    1. Overview of Transmission Types

    Modern vehicles typically come with two main transmission types:

    • Automatic Transmission: Uses a torque converter or dual‑clutch system to shift gears without driver input.
    • Manual Transmission (Stick Shift): Requires the driver to engage the clutch and select gears using a gear lever.

    Each type has evolved with technology—automatic gearboxes now offer more gears and improved efficiency, while manuals boast simplicity and driver engagement.

    2. How Automatic Transmissions Work

    An automatic transmission relies on hydraulic fluid and planetary gear sets to change gears seamlessly. Key components include:

    • Torque Converter: Replaces the clutch, allowing the engine to spin somewhat independently of the transmission.
    • Planetary Gear Sets: Provide multiple gear ratios within a compact design.
    • Electronic Controls: Sensors and actuators determine shift timing for smooth performance.

    Pros of Automatic Transmissions

    • Ease of Use: No clutch pedal makes driving in traffic less stressful.
    • Smooth Shifts: Modern automatics often shift faster and more efficiently than humans.
    • Wider Availability: Most new cars, especially crossovers and luxury models, come standard with automatics.

    Cons of Automatic Transmissions

    • Higher Cost: Automatics are generally more expensive to buy and maintain.
    • Fuel Efficiency: Older automatics lag behind manuals, though newer designs have largely closed the gap.
    • Complexity: More moving parts can mean higher repair costs if something goes wrong.

    3. How Manual Transmissions Work

    A manual transmission uses a clutch pedal and gear lever to transfer power from the engine to the wheels. Main elements include:

    • Clutch Assembly: Engages and disengages the engine from the gearbox.
    • Gearbox: Contains a set of gears that the driver selects.
    • Shift Linkage: Mechanically connects the gear lever to the transmission.

    Pros of Manual Transmissions

    • Driver Control: Greater engagement and ability to hold gears for acceleration or engine braking.
    • Lower
  • Brake System Components Explained: Pads, Rotors, and Calipers

    Brake System Components Explained: Pads, Rotors, and Calipers

    Your car’s stopping power depends entirely on its brake system working flawlessly. Understanding the key brake system parts—from the friction‑generating pads to the spinning rotors and the hydraulic calipers—will help you appreciate how brakes work and why regular brake maintenance is essential. In this guide, we’ll break down each component’s role, explain the braking process step by step, and share maintenance tips to keep your brakes performing safely.

    1. Core Brake System Parts

    Brake Pads

    Brake pads are the replaceable friction material that clamp down on the rotor to slow your vehicle. They consist of a metal backing plate bonded to a high‑friction composite surface. As the pads wear against the rotor, they gradually thin out and must be replaced—typically every 30,000 to 70,000 miles depending on driving style and pad compound.

    Brake Rotors (Discs)

    Rotors are the smooth, flat discs that spin with each wheel. When you press the brake pedal, the caliper squeezes the pads against both sides of the rotor, converting your car’s kinetic energy into heat. Rotors come in various designs—solid, vented, drilled, and slotted—to manage heat dissipation and resist warping under heavy use.

    Brake Calipers

    Calipers house the hydraulic pistons that push the pads into the rotor. In a typical floating‑caliper design, the caliper body slides on pins, allowing it to self‑center over the rotor. High‑performance cars may use fixed calipers with multiple pistons for more even pressure distribution and quicker response.

    2. How Brakes Work: The Hydraulic Braking Process

    The modern automotive brake system uses hydraulic fluid to transmit force from the pedal to the calipers. Here’s a step‑by‑step overview of how brakes work:

    1. Pushing the Pedal: When you depress the brake pedal, it pushes a piston in the master cylinder, forcing brake fluid out through the brake lines.
    2. Fluid Transfer: The incompressible brake fluid travels through metal and rubber lines to each wheel’s caliper.
    3. Caliper Activation: Inside the caliper, the fluid pressure pushes one or more pistons outward.
    4. Pad Engagement: The pistons press the brake pads against the spinning rotor’s surface.
    5. Friction & Heat: The pad‐to‐rotor friction slows wheel rotation, converting motion into heat, which dissipates into the air through the rotor design.
    6. Releasing the Pedal: Releasing the brake pedal reduces hydraulic pressure, retracting the pistons and letting the pads pull away from the rotor.

    3. Brake Maintenance Best Practices

    Regular brake maintenance keeps all components in good shape and prevents costly repairs or dangerous failures. Follow these guidelines:

    • Inspect Pads & Rotors: Check pad thickness and rotor surface every 6,000 miles. Replace pads below manufacturer‑specified minimum thickness (usually around 3 mm) and resurface or replace rotors showing scoring or warping.
    • Bleed the Brake Lines: Flush and replace brake fluid every 2 years or 24,000 miles. Moisture in old fluid can corrode calipers and reduce braking efficiency.
    • Check Caliper Function: Ensure caliper pistons move freely. Sticking calipers can cause uneven pad wear and overheating.
    • Listen for Warning Signs: Squealing or grinding noises often indicate worn pads or glazed rotors. Vibration in the pedal or steering wheel under braking can signal warped rotors.
    • Use Quality Parts: Always choose OEM or high‑quality aftermarket pads and rotors that match your vehicle’s specifications for optimal performance and longevity.

    4. When to Seek Professional Help

    While many maintenance tasks are DIY‑friendly, seek a qualified mechanic if you notice any of the following:

    • Brake pedal gradually sinking toward the floor.
    • Fluid leaks near wheels or under the master cylinder.
    • Extreme vibration or “pulsing” under braking.
    • Unusual dashboard warning lights (e.g., ABS indicator).

    Timely professional inspection ensures your safety and prevents small issues from becoming major repairs.

    Conclusion

    By understanding the roles of brake system parts—pads, rotors, and calipers—you’ll know exactly how brakes work and when to perform crucial brake maintenance. Regular inspections, fluid changes, and timely part replacements not only extend the life of your braking system but also keep you safe on the road. Make brake care a priority, and you’ll enjoy peace of mind every time you press the pedal.